|
|
||||

|

|

|

|
|
How to take a Sony Vaio PCG-5426 Laptop apart to replace the hard diskIntro and Slight RantYou might ask why I had to do this, because Sony run a laptop servicing service. Well the laptop was only 18 months old and the hard disk was fairly dead (consistenly getting random bad sectors every time a few Win 2K applications were run), so we thought it was worth repairing. Sony picked up the laptop, after we paid a wee bit of money, then told us that it would cost £280 to replace the HDD. Given that one can buy a new 20GB HDD for about £80 we thought this was a bit much. Laptop was returned, and we paid a wee bit more money for the Sony analysis. I've taken laptops apart before to replace hard disks, but I have never experiened anything like this before. It took me 2 hours with a few contemplative breaks, and I thought I had broken it several times during the process!! Most laptops have nice little panels that require you to take out a couple of screws and remove the panel to get at the memory, CPU or HDD. Not this Sony. You have to almost completely take the casing apart. I could not find any insutructions/manuals/tips anywhere (including on Sony'website) to help with this. The ProcessYou'll need the following tools:
Remove all of the screws on the underside that hold the keyboard onto the base of the laptop.
Remove the keyboard 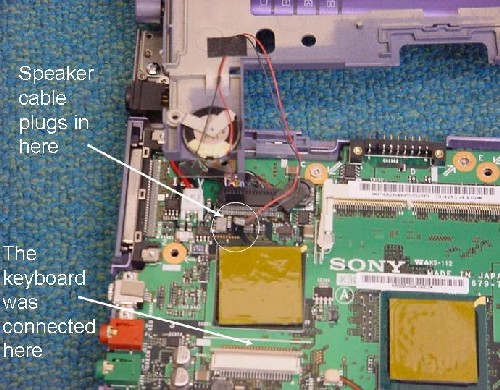
The casing is in two halves: upper and lower. To get them apart you need to remove the purple plastic covers that are, kind of, in between the screen hinges and the base: Use a screwdriver to pry them off. With the keyboard removed (yes I know the keyboard is attached to the Vaio in this picture) you can get at the purple plastic bits more easily from slightly inside. 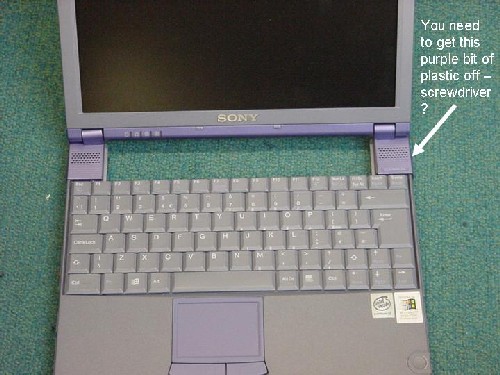
The white cable for the touchpad can also be disconnected (it actually pinged off for me and I thought I had broken the connection, but it seems that there is a little plastic clip that holds it in): 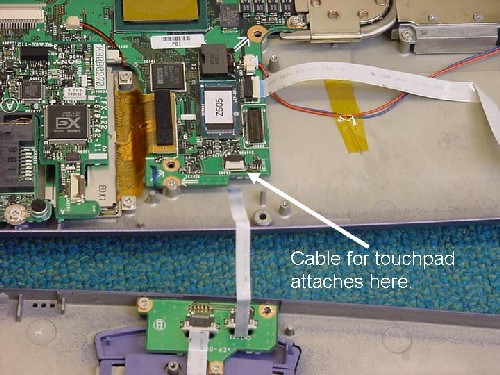
Da daaaa!! you should now be the proud owner of a Vaio that looks like this: 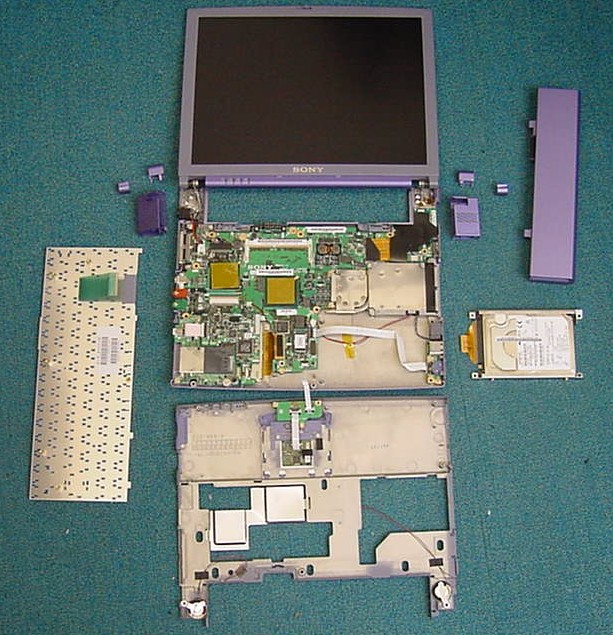
Now you should be able to seperate the upper casing from the lower casing. Now you can unscrew the 4 little screws that hold the HDD caddy in place, and you can take it out, bin it, and order a new one. There are plenty of places that supply laptop HDD's and you'll probably end up with a larger capacity one. Amazingly the whole thing can be put back together without too much fuss, although you might be lacking some little plastic clippy bits that got broken and/or have some extra screws left over.... That's all folks. |